Update, Feb 2022: Of course, I found better documentation here: https://github.com/tprelog/iocage-homeassistant/wiki/Updating-Home-Assistant. Original post below.
Saturday, November 13, 2021
Saturday, October 17, 2020
DIY Roof Rack for 2007-2011 Honda CRV
I am bringing this blog out of hibernation to post something that will eventually help maybe one or two people, many years from now. If it does, leave me a comment, I'd love to hear about it.
We have an upcoming project that will require a bunch of building things, involving 4x8 sheets of plywood. These cannot fit in a Honda CRV (at least not mine, a 2009 model).

I was inspired by this post on Mr. Money Mustache about building a DIY roof rack. I love this idea vs. paying for delivery, and unlocking future utility in my vehicle.
MMM's solution is to build a rigid square, strap/bungee the square to the frame, then load it up. I wanted to aim a bit higher and have something more durable - I'm too paranoid about a load flying off.
I started Googling "DIY roof rack Honda CRV" and didn't find much out there. The first thing I learned is that the 2007-2011 CRV has 8 bolts available for attaching roof racks. Plastic covers can be simply popped off with a flathead screwdriver:

Identifying the bolt type was another challenge. I found a great video by "James" on Youtube who identified conclusively the required part to make a rock-solid homemade roof rack:
M8 1.25-pitch coupling nuts
I looked all over Saskatoon but no one carried them. I found these deez nuts at Canadian Tire but they are only a few mm tall; they are not "coupling":

I brought them home and verified that yes, these conclusively fit the 2007-11 CRV.
Note: Apparently the bolts on top of the CRV are painted at the factory. This means the nuts are a bit hard to screw on at first. Installing a nut all the way and removing it makes it easier next time.
Then I ordered a 10-pack of these coupling nuts on Amazon at a cost of $16, plus extra for fast shipping


I don't have a good close-up of how the frame is attached to the car, but here's how I stacked all the components:
- CRV: M8 bolt built into car.
- Flat metal washer just less than 1" in diameter - this ensures the first nut is about the right height.
- M8 1.25 nut from the package about (this gets the coupling nut a but higher)
- M8 1.25 30mm coupling nut from the Amazon link above.
- 2"x4" plywood block to stand the roof rack frame over the car roof
- M8 1.25 50mm bolt (just the right height to go through a 2x4 and into the coupling nut
The result is a SOLID roof rack at a final cost of under $40 (coupling nuts, 4 washers, and metric bolts;, all the wood was free/scrap). Here is the rack unloaded, loaded at Home Depot with two plywood sheets and some siding for the garage:


Wednesday, June 6, 2018
Rebuilding a 1977 Luxman L-30 Stereo Amplifier
My uncle asked me if I could repair his Luxman L-30 stereo amplifier, circa 1976-78. I said I could, so I did!
The L-30 is a 2x35W integrated amp made by Lux corporation in Japan. The company is still around, making hifi products.
When Uncle Pete brought over his amp, it was dirty from sitting around, unused, for many years. One of the knobs had come apart. Turning the knobs while the unit was powered on produced some awful scratching noises, and the knobs were stiff and difficult to manipulate.

I took the amp apart for the first time and cleaned the potentiometers with DeoxIT, a miracle contact cleaner. After turning each knob back and forth about a hundred times, the crackling was eliminated. I also blew out a cubic foot of dust and made some observations about the electronic guts.

Many of the original electrolytic capacitors had leaked their electrolyte gunk (see the big black one in the image below).

I found a great resource on repairing this exact amplifier. The author advised to check the small signal transistors for a "silver oxide creeping disease". The problem was that in the 70s, Hitachi "tinned" the leads of many transistors with silver (instead of tin). Silver oxidises over time, and the rust creeps up the legs of the transistors and eventually rots the guts.
Next up were the transistors. They are trickier than capacitors:

One more set of calibrations as a sanity-check, then I assembled the L-30 for the last time. I'd cleaned and polished the faceplate and all the knobs. The volume knob, which had fallen apart, was securely glued back together.
I plugged the unit it and dropped in an Ella Fitzgerald & Louis Armstrong album that I found in my parents' collection. I don't have the musical vocabulary to describe it as anything other than AMAZING. Superb warm sound.
That was Sunday night, and over the next few nights I listened to all kinds of stuff. It's hard to explain how the Luxman L-30 drives my KEF LS50 speakers in a totally different way than my NAD 3020 (rebuilt 2 years ago, and going strong). I was in love.
My Uncle Pete came over tonight to pick it up, and I think he was blown away. He brought over a record (I don't recall which one!) and we listened to most of the A side. Then we listened to tracks from The Sword, The Rolling Stones, Yngwie Malmsteen, Tony Bird, Eternal Champion, Iron Maiden, and Buffalo Springfield.
He was excited to be leaving with it, and I was sad to see it go! This was an exceptionally fun project, and challenging because I make some mistakes along the way. That's OK because I learned more than I would have otherwise.
What's next?
Full album/gallery.
The L-30 is a 2x35W integrated amp made by Lux corporation in Japan. The company is still around, making hifi products.
When Uncle Pete brought over his amp, it was dirty from sitting around, unused, for many years. One of the knobs had come apart. Turning the knobs while the unit was powered on produced some awful scratching noises, and the knobs were stiff and difficult to manipulate.

I took the amp apart for the first time and cleaned the potentiometers with DeoxIT, a miracle contact cleaner. After turning each knob back and forth about a hundred times, the crackling was eliminated. I also blew out a cubic foot of dust and made some observations about the electronic guts.

Many of the original electrolytic capacitors had leaked their electrolyte gunk (see the big black one in the image below).

I found a great resource on repairing this exact amplifier. The author advised to check the small signal transistors for a "silver oxide creeping disease". The problem was that in the 70s, Hitachi "tinned" the leads of many transistors with silver (instead of tin). Silver oxidises over time, and the rust creeps up the legs of the transistors and eventually rots the guts.
 |
| It's hard to tell that the leads of the smaller transistor (installed back-to-back with a larger one) has blackened legs, not silvery/metallic like the other components. |
I found some great supporting resources:
- Luxman L-30 Service Manual - circuit schematic, parts list, circuit board layout diagrams, and re-calibration info. Absolutely critical!
- Hans Hilberink's Luxman Vintage Audio Website, specifically this page about the L-30.
- Vintage Audio Repair L-30 - Dutch website with great before-and-after pictures of an L-30 rebuild.
So, what's the final scope? I decided to:
- Replace 42 electrolytic capacitors, same specs as originals. I am not savvy enough with analog circuits to contemplate upgrades;
- Replace 17 small transistors (TO-92 package);
- Replace the factory speaker terminals with newer, nicer binding posts with banana plug connectors;
- Do a nice cosmetic cleanup of the knobs and faceplate.
What I did, and what I learned.
I spec'd and ordered all my parts from Digikey. My parts list is here on Google Sheets. I ordered Nichicon brand capacitors (UKA, USW and UKT series) and ON Semiconductor transistors. For the capacitors, if I couldn't find an exact replacement, I spec'd the same capacitance at the next-highest voltage rating.
I splurged and bought wire labels for disassembly. This was probably the best idea I had for the entire project. The kit of professional wire labels kept me organized and made re-assembly a cinch. (the link to the kit is in my parts spreadsheet, linked above).
Mistake #1: Instead of desoldering the wired pins from the circuit board, I desoldered the wires from the pins, instead of the pins from the board. This made reassembly WAY harder than it needed to be! In fact, to reassemble, I desoldered the pins from the board, soldered the pins to the wires, then soldered the pins back into the board. I doubled my work for no reason.
 |
| Top: Desoldered pins from wires. Mistake! Bottom: Pins soldered to wires, with nice labels. |
First up for replacement were the capacitors. They were simple to replace because the polarity is printed on the circuit boards.
Another great purchase for this project was a solder-sucker. Previously I'd only used desoldering braid (copper braid that absorbs solder when heated). A solder-sucker makes it SO EASY to remove components - suck off most of the solder with a puff of air, then remove the tiny remaining bit with braid. The sucker I got is on my parts list too.
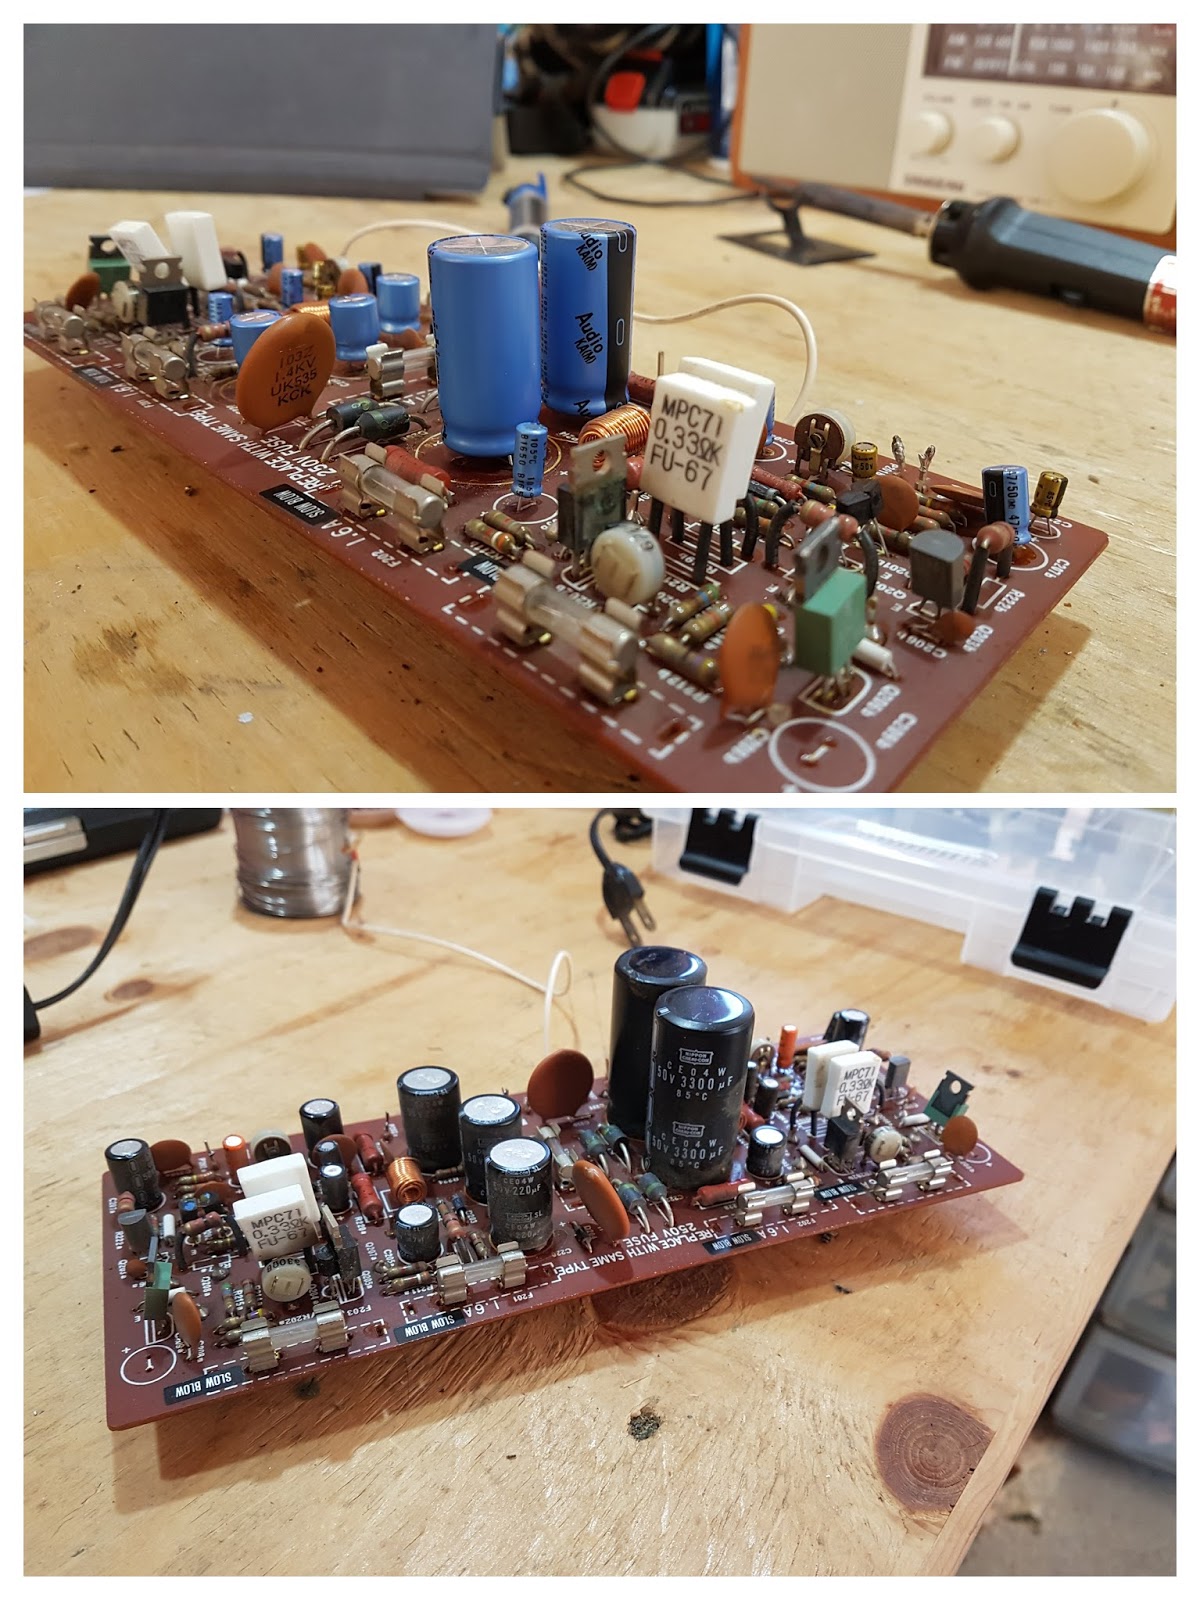 |
| Top: New capacitors in blue (bigger ones) and gold (smaller ones). Bottom: Original PB-1009 circuit board. |
- They have three leads (leads);
- The pin-out of the new transistors (Emitter-Base-Collector) is different from the old (Emitter-Collector-Base), and;
- They must be installed correctly or else they won't function as intended! Funny things will happen.
 |
| Top: PB-1008 with new capacitors (blue, gold) and transistors (black). Bottom: Original circuit board. |
The last upgrade was replacing the old wind-only speaker binding posts with modern banana jacks, where you can wind or insert your bare speaker wire, or plug in a cable with a banana plug.
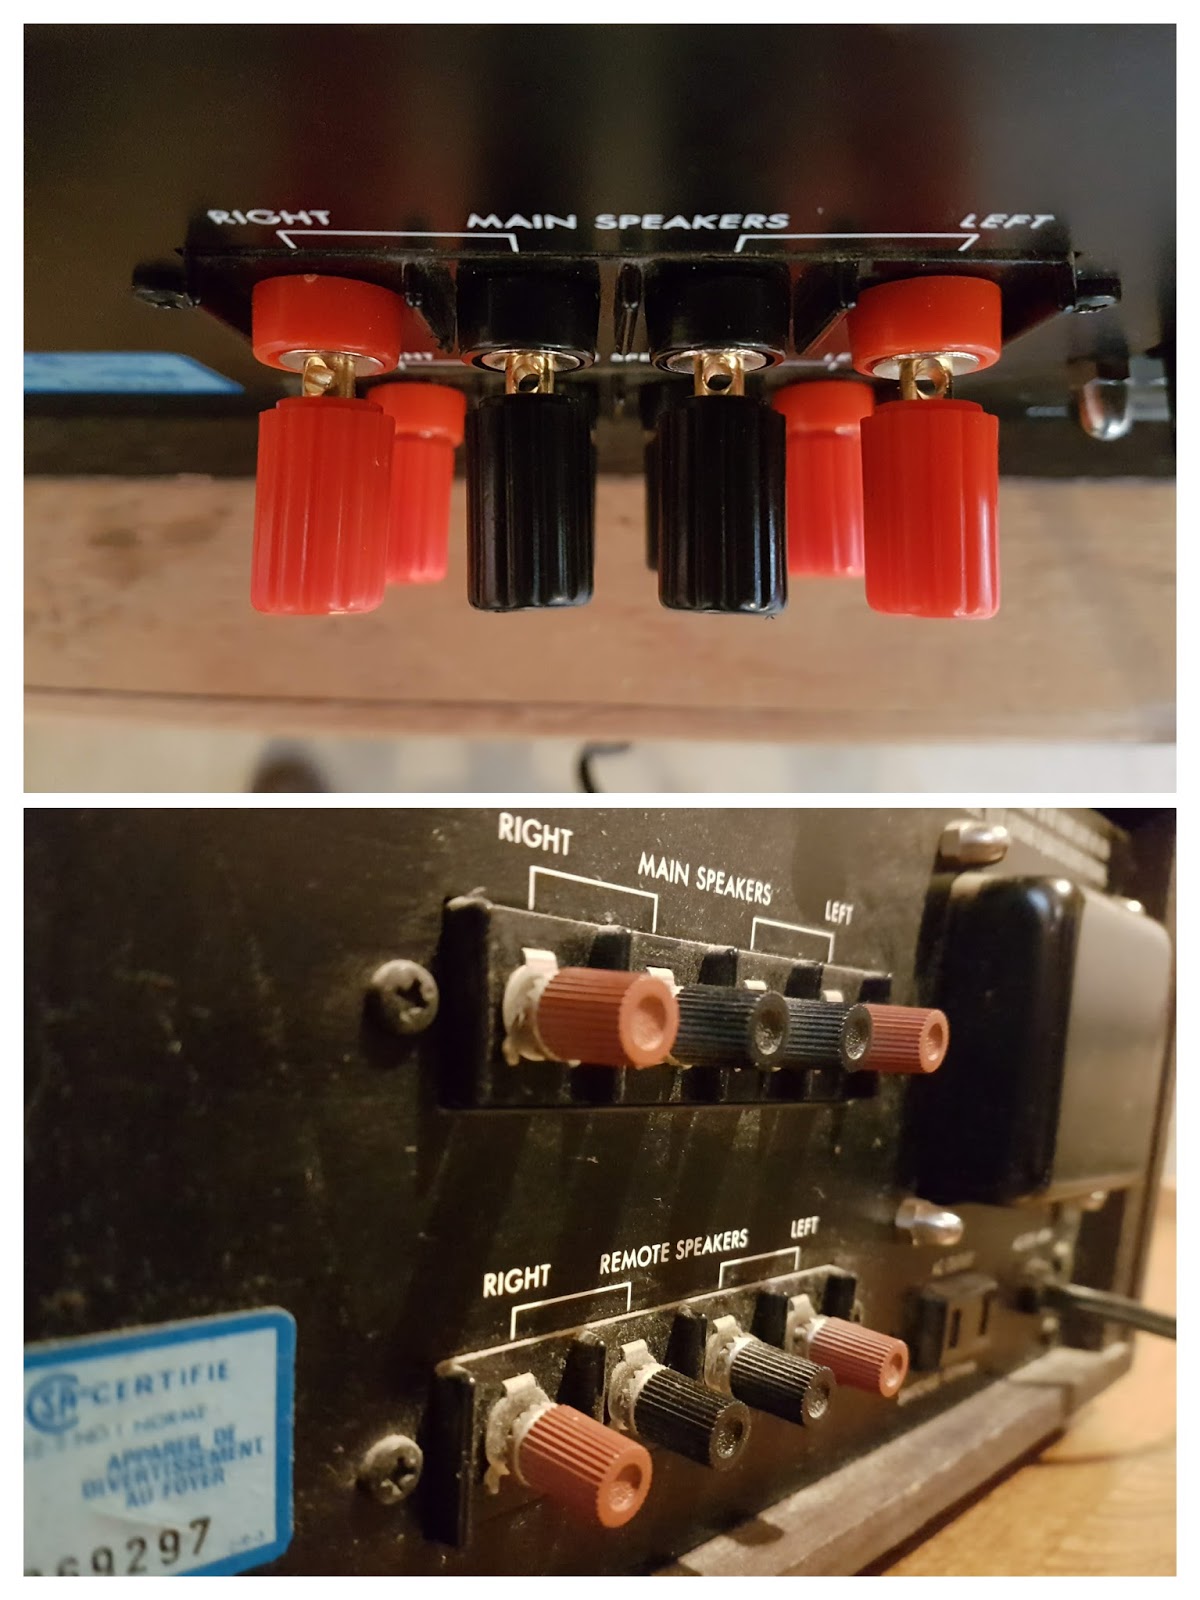 |
| Top: New binding posts. Bottom: Original speaker terminals. |
Next up: testing and reassembly.
I carefully reconnected the pins and wires to the two main circuit boards and arranged them back in the case. I followed the instructions in the service manual to do the 2-step calibration. Step One was an "Idle [current] adjust"; you remove a pair of fuses and measure the current between two terminals. If, after a minute of power-on time you're reading 45mA, you're good to go. I was fine. A good start!
Mistake #2: The second step is to check the "Zero DC [voltage] offset". You want the reading across each channel's speaker terminals within +/- 50mV (millivolts). I measured the right channel at about 25mV. I measured the left channel at 33V - over 600 times what I expected!
Disappointed, I pulled everything apart and started hunting for mistakes. I knew it was going to be a transistor installed incorrectly because one channel was good, one bad, and capacitors don't amplify voltages. After a few minutes of searching, and double- and triple-checking my work, I found one transistor (Q202a) installed incorrectly.
Lesson learned: the calibration procedure was critical. If I had just plugged it into my speakers to test, I'd be shopping for a new pair of speakers.
 |
| Work bench during one disassembly. |
Excited, I put everything back together for final testing. Both calibration checks checked out. All good. It's time to fire this baby up!
I assembled the amp and took it inside. I powered it on. I queued up a record, dropped the needle, and....
Nothing.
Not a sound came out of the speakers. I turned up the sound just a bit. I heard something - so I maxed it. Terrible, choppy, intermittent sound. I could hear all the loud bits but the quiet parts of the song just dropped off. Stuttery.
My heart fell - I really thought it was going to work. I had no idea what the problem might be. Disappointed, I went back to the garage for disassembly #3.
Mistake #3: Since the problem was present on both channels, I reasoned that I had a serious issue with parts/components. I printed out 7 transistor data sheets (4 old types, 3 new) and started comparing specs.
After a few minutes of comparing data sheets I realized that I did something so dumb that I had to quadruple-check to be sure. Everywhere I wanted to install a BC550 transistor, I'd installed a BC560, and vice-versa.
How did I manage something like this? I looked at my parts list, and from Day 1 I'd spec'd the wrong transistors.
I figured it out later that day. Looking at Hilberink's website again, he says:
The 2SA836 and 2SC1345 made by Hitachi will sooner or later add a lot of noise and even storm and thunder to your RIAA amp. [...]I read these two sentences, and without even thinking to double check, noted to replace 2SA836 units with BC550, and to replace 2SC1345 units with BC560. In fact, it should have been the other way around (2SA836->BC560, both PNP type, and 2SC1345->BC550, both NPN type). This was totally my error - rushing, misunderstanding, and not double checking. I only had to replace 11 transistors and I'd be all set.
Replace with modern BC550C/BC560C and all noise problems are history.

One more set of calibrations as a sanity-check, then I assembled the L-30 for the last time. I'd cleaned and polished the faceplate and all the knobs. The volume knob, which had fallen apart, was securely glued back together.
I plugged the unit it and dropped in an Ella Fitzgerald & Louis Armstrong album that I found in my parents' collection. I don't have the musical vocabulary to describe it as anything other than AMAZING. Superb warm sound.
 |
| That warm sound... get it? |
My Uncle Pete came over tonight to pick it up, and I think he was blown away. He brought over a record (I don't recall which one!) and we listened to most of the A side. Then we listened to tracks from The Sword, The Rolling Stones, Yngwie Malmsteen, Tony Bird, Eternal Champion, Iron Maiden, and Buffalo Springfield.
What's next?
Full album/gallery.
Thursday, August 4, 2016
Re-cap on NAD 3020 Stereo Amplifier
A few weeks back I started hunting for a turntable and amplifier. My dad had his old kit boxed up in my parents' garage and he was happy to give the NAD 3020 amp and Onkyo CP-1010A turntable a new home!
After connecting all the gear, everything sounded good (so, so good), but occasionally the right stereo channel would drop out. A sharp tap on the amplifier would bring it back. Apparently this is symptomatic of failed or failing capacitors, because electrolytic capacitors are generally not designed to last 30 years or more.
I found the service manual for the NAD 3020 online and was amazed to find a full design circuit diagram, parts list, and labelled circuit board wiring diagram. Replacing the caps was going to be easy.
I put together a quick parts list of all the capacitors I had to replace - 42 in total. Only the electrolytic capacitors required replacement because the conductive electrolyte inside them can (and did) leak over time. The ceramic and mylar capacitors inside all passed a visual inspection.
I placed a Digikey order (~$60 for the bare minimum parts but I ordered spares and ended up around ~$90) and warmed up my soldering iron. Sure enough, a good number of the caps were trashed:

One daugherboard with caps removed. You can see the gunk where the electrolyte leaked in at least two places.

The order arrived and I started installing new caps Here's that daugherboard back in place. Anything blue or gold in this pic is brand new:

These 2200 μF caps were the biggest, and replaced 4 completely trashed caps on the input power filtering (I think). All the new parts were different brands and dimensions than the old ones, but that's okay. For cap replacements, as long as the capacitance is the same and the voltage rating matches or lightly exceeds the original, you should be good. Or so I read.

Powered back up!

The first thing I noticed was that everything sounded a bit sharper, but the amp still has a beautiful warm tone. When I listen to music on this setup, I am amazed to hear new details in songs I've heard hundreds of times - instrumental trills, soft vocals, basslines, and more.
Monday, June 20, 2016
MLB.com Fantasy Baseball Score Checker
I've been hacking away on a project for my fantasy baseball league. MLB.com's fantasy baseball has its daily scoreboard in flash, so it doesn't work on mobile.
Not only did I want to check my score on mobile, I thought having easily accessible scores on mobile would make things more engaging for the whole league!
I wrote a python script to scrape values from MLB servers and display them in a simple interface:
The basic flow of the script is:
Not only did I want to check my score on mobile, I thought having easily accessible scores on mobile would make things more engaging for the whole league!
I wrote a python script to scrape values from MLB servers and display them in a simple interface:
 |
| This league has classy team names. |
- Get the fantasy league schedule JSON data from this URL:
http://www.mlb.com/fantasylookup/json/named.fb_index_schedule.bam?league_id=1514
Note the league_id can be found with CTRL-F if you "view source" on your league homepage. - Process the fantasy league schedule and build a big Python dictionary called this_week (I should have built a class - maybe that's on the todo list). This step figures out all of the fantasy team_id's that belong to your league_id.
Also, build each team's roster based on the fantasy team roster data. The period_id comes from the schedule data, and the player_ids come from here:
http://www.mlb.com/fantasylookup/json/named.fb_team_lineup.bam?&team_id=9972&period_id=13 - Figure out which games are being currently played in real life. This can be done by counting the number of folders containing matching regex gid_[0-9]{4}_[0-9]{2}_[0-9]{2}[a-z0-9_]* from this directory:
http://gdx.mlb.com/components/game/mlb/year_2016/month_04/day_25/ (substitute today's date)
Specifically, we are looking for the boxscore.json files for each game:
http://gdx.mlb.com/components/game/mlb/year_2016/month_04/day_25/gid_2016_04_25_chamlb_tormlb_1/boxscore.json
We are going to use these to calculate the fantasy points for each player's real-life stats. - Grab every boxscore.json file for today's real-life games, read the data and build a monster dictionary called super_boxscore.
- Loop through all of the fantasy player rosters in the this_week variable, and look up the player_ids in the super_boxscore variable. Calculate fantasy points for each player_id.
- Show the results!
I wrote most of this blog post a month ago, intending to add more features and make a richer blog post. Sadly, like many of my projects it has stalled at nowhere near completion and I have not put in any time over the last 4-5 weeks!
But if you are running an MLB.com fantasy league and you want a better mobile interface for your members, check out my project on Github: https://github.com/b-neufeld/mlb-fantasy-checker
Thursday, May 12, 2016
Automatically Generate Screenshots of Foxboro I/A Graphics
At work we have a Foxboro I/A control system. I was getting a lot of requests to take screenshots of control system graphics - which I don't mind fulfilling, because usually someone wants to make something better.
I wanted a better way to fulfill these requests! Something that can do everything at once.
I found an old post on the "Foxboro Freelist", a user-run mailing list for Foxboro system maintainers. Back in November I posted an improved version, but I have improved it again since (continue reading).
I wanted a better way to fulfill these requests! Something that can do everything at once.
I found an old post on the "Foxboro Freelist", a user-run mailing list for Foxboro system maintainers. Back in November I posted an improved version, but I have improved it again since (continue reading).
for DISP in $(find /opt/graphics/disp/ /opt/graphics/control/ /opt/graphics/trend/ /opt/graphics/loadout/disp/ /opt/graphics/powerhouse/ -name "*.fdf")Notes:
do
cd d:
pref -SPR1SR dmcmd /opt/graphics/disp/BLANKSCRN.fdf
sleep 2
echo $DISP
pref -SPR1SR dmcmd $DISP
sleep 5
cd 'C:/Program Files (x86)/HyperSnap 6'
echo $PWD
FILE=$(echo `date +%Y-%m-%d`$DISP | sed 's/\//-/g')
echo $FILE
SAV="D:/opt/screenshots/$FILE.png"
echo $SAV
HprSnap6 -snap:awin -save:png $SAV
pref -SPR2SR dmcmd close
done
exit
- In the first FOR statement, you can specify as many graphics subfolders as you want.
- Replace SPR1SR with the DM (Display Manager) name of the FoxView instance you will be working on. The script calls the graphic to the DM you specify, then calls HyperSnap via its command line interface to take a screenshot.
- Just to be clear, the script WILL open these graphics live on your AW (application workstation) and take a screenshot. It won't happen in the background. So if you have any graphics that invoke scripts when opened or closed, exclude those folders from the FOR statement.
- This will tie up your AW for however long it takes to open all of your graphics. I like to run the script at the end of the day. If the screensaver comes on, it does not seem to matter.
- Create a blank graphic (BLANKSCRN.fdf) for the script to call in between live process graphics.
- The sleep commands are necessary because Foxboro users know that graphics don't load instantly - graphics need to query data from the OM (Object Manager) before they're usable.
- Assumes you have HyperSnap 6 installed (should ship with all AW's)
- The output file is named with the date, folder path and filename. For example, 2016-05-12-path-to-graphic-filename.fdf.png.
- The echo statements are unnecessary, but it is useful to see their output for debugging.
- Save the above as a .ksh file and run in the Kornshell environment.
- If you want to generate screenshots of overlay files (popups), change this:
- pref -SPR1SR dmcmd $DISP
- to this:
- pref -SPR1SR dmcmd "dmcmd ov $DISP -l MIDDLE -move"
Since coming up with this script, we generate screenshots of 200+ graphics on a monthly basis and drop them in a network folder on our Business LAN. This way, anyone who is interested can take a look at the current state of the control graphics, find errors and suggest improvements.
Drop me a line if you find this through Google - I'd love to know if this helped you out!
Update 2016-05-27: I've put this up on Github so people can download the .ksh directly, or contribute to making it better! https://github.com/b-neufeld/fox-auto-generate-screenshots
Update 2016-05-27: I've put this up on Github so people can download the .ksh directly, or contribute to making it better! https://github.com/b-neufeld/fox-auto-generate-screenshots
Wednesday, April 6, 2016
Quiche Lorraine
More Great British Bake Off-inspired cooking - I made Quiche Lorraine today. I've never made a quiche before in my life! It was fun and delicious.
I found this recipe that was the main inspiration, but I wanted to add broccoli so I took some hints from this recipe too. I also have a 22cm tin and the recipe called for 20cm, so I tried to scale everything up a bit.
Final ingredients list for my version:
Pastry
100g butter, cubed
200g all-purpose flour
3 1/4 tbsp cold water
Hand mix flour & butter to crumb consistency, add water, form dough ball, roll out on floured counter, set in tin, refrigerate 20-30 minutes, blind bake 10 minutes at 450 degrees, remove blind and bake 10 more minutes.
Filling
6 strips of bacon
1 big onion, sliced & carmelized
1 medium broccoli crown, cut small and added to the onions for the last 10 min of carmelization
160g Gruyère cheese, grated 4 large eggs
200 ml whipping cream
100 ml whole milk
Salt & pepper
It ended up taking about 40-45 minutes in the oven at 350 degrees.
Results
It was GREAT if I do say so myself! Could have used a bit more salt, a bit more filling overall, but I'd make this again for sure.


Subscribe to:
Posts (Atom)