The L-30 is a 2x35W integrated amp made by Lux corporation in Japan. The company is still around, making hifi products.
When Uncle Pete brought over his amp, it was dirty from sitting around, unused, for many years. One of the knobs had come apart. Turning the knobs while the unit was powered on produced some awful scratching noises, and the knobs were stiff and difficult to manipulate.

I took the amp apart for the first time and cleaned the potentiometers with DeoxIT, a miracle contact cleaner. After turning each knob back and forth about a hundred times, the crackling was eliminated. I also blew out a cubic foot of dust and made some observations about the electronic guts.

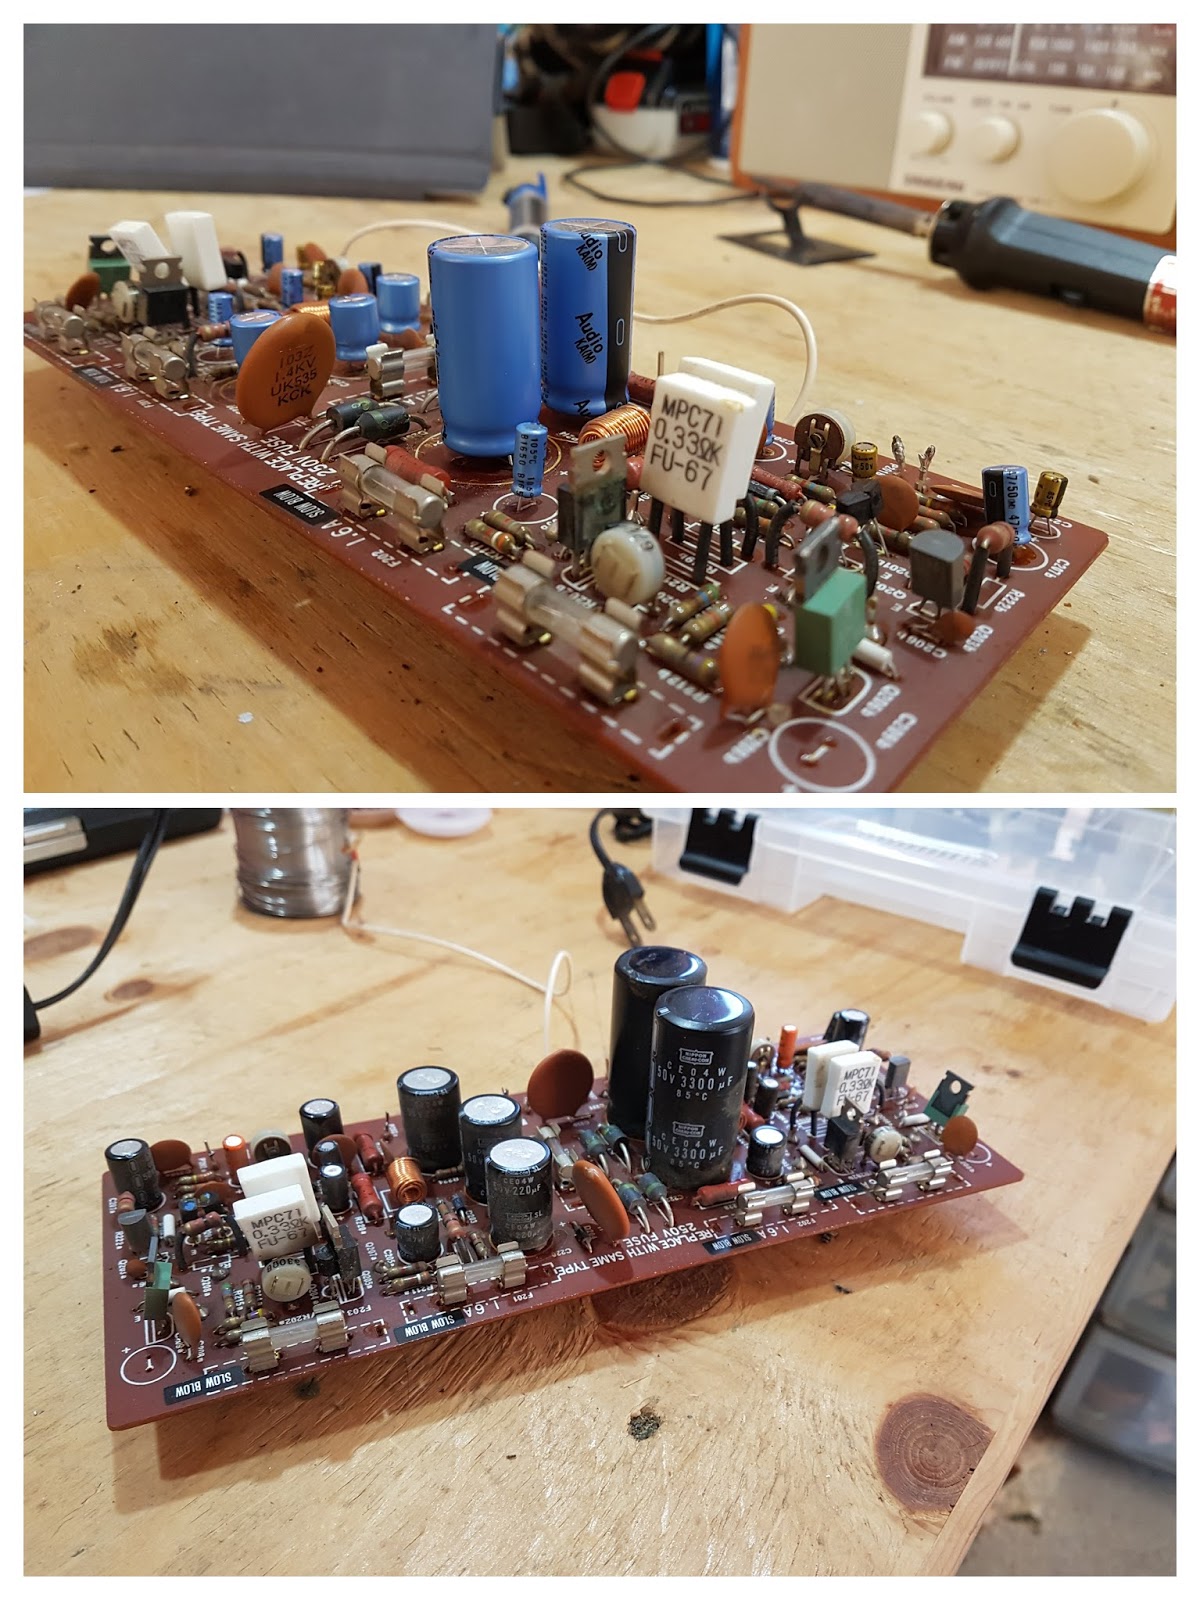
Many of the original electrolytic capacitors had leaked their electrolyte gunk (see the big black one in the image below).

I found a great resource on repairing this exact amplifier. The author advised to check the small signal transistors for a "silver oxide creeping disease". The problem was that in the 70s, Hitachi "tinned" the leads of many transistors with silver (instead of tin). Silver oxidises over time, and the rust creeps up the legs of the transistors and eventually rots the guts.
 |
| It's hard to tell that the leads of the smaller transistor (installed back-to-back with a larger one) has blackened legs, not silvery/metallic like the other components. |
I found some great supporting resources:
- Luxman L-30 Service Manual - circuit schematic, parts list, circuit board layout diagrams, and re-calibration info. Absolutely critical!
- Hans Hilberink's Luxman Vintage Audio Website, specifically this page about the L-30.
- Vintage Audio Repair L-30 - Dutch website with great before-and-after pictures of an L-30 rebuild.
So, what's the final scope? I decided to:
- Replace 42 electrolytic capacitors, same specs as originals. I am not savvy enough with analog circuits to contemplate upgrades;
- Replace 17 small transistors (TO-92 package);
- Replace the factory speaker terminals with newer, nicer binding posts with banana plug connectors;
- Do a nice cosmetic cleanup of the knobs and faceplate.
What I did, and what I learned.
I spec'd and ordered all my parts from Digikey. My parts list is here on Google Sheets. I ordered Nichicon brand capacitors (UKA, USW and UKT series) and ON Semiconductor transistors. For the capacitors, if I couldn't find an exact replacement, I spec'd the same capacitance at the next-highest voltage rating.
I splurged and bought wire labels for disassembly. This was probably the best idea I had for the entire project. The kit of professional wire labels kept me organized and made re-assembly a cinch. (the link to the kit is in my parts spreadsheet, linked above).
Mistake #1: Instead of desoldering the wired pins from the circuit board, I desoldered the wires from the pins, instead of the pins from the board. This made reassembly WAY harder than it needed to be! In fact, to reassemble, I desoldered the pins from the board, soldered the pins to the wires, then soldered the pins back into the board. I doubled my work for no reason.
 |
| Top: Desoldered pins from wires. Mistake! Bottom: Pins soldered to wires, with nice labels. |
First up for replacement were the capacitors. They were simple to replace because the polarity is printed on the circuit boards.
Another great purchase for this project was a solder-sucker. Previously I'd only used desoldering braid (copper braid that absorbs solder when heated). A solder-sucker makes it SO EASY to remove components - suck off most of the solder with a puff of air, then remove the tiny remaining bit with braid. The sucker I got is on my parts list too.
 |
| Top: New capacitors in blue (bigger ones) and gold (smaller ones). Bottom: Original PB-1009 circuit board. |
- They have three leads (leads);
- The pin-out of the new transistors (Emitter-Base-Collector) is different from the old (Emitter-Collector-Base), and;
- They must be installed correctly or else they won't function as intended! Funny things will happen.
 |
| Top: PB-1008 with new capacitors (blue, gold) and transistors (black). Bottom: Original circuit board. |
The last upgrade was replacing the old wind-only speaker binding posts with modern banana jacks, where you can wind or insert your bare speaker wire, or plug in a cable with a banana plug.
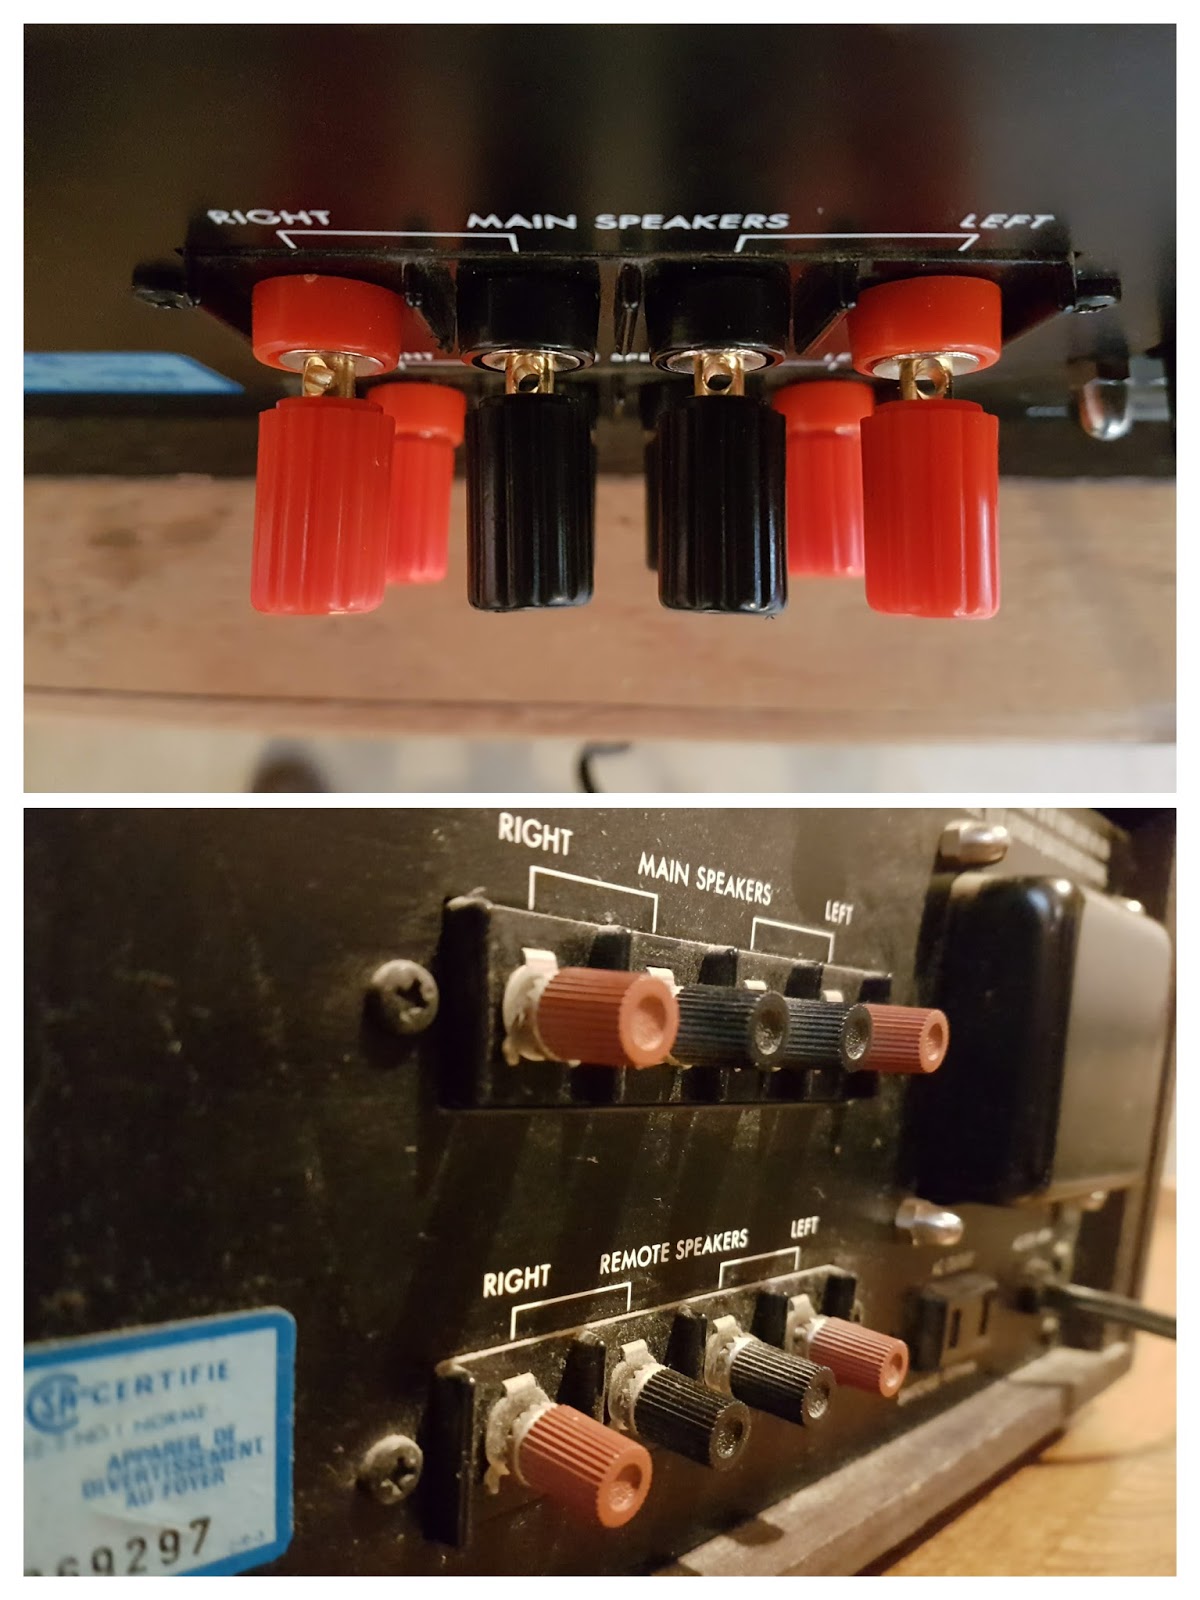 |
| Top: New binding posts. Bottom: Original speaker terminals. |
Next up: testing and reassembly.
I carefully reconnected the pins and wires to the two main circuit boards and arranged them back in the case. I followed the instructions in the service manual to do the 2-step calibration. Step One was an "Idle [current] adjust"; you remove a pair of fuses and measure the current between two terminals. If, after a minute of power-on time you're reading 45mA, you're good to go. I was fine. A good start!
Mistake #2: The second step is to check the "Zero DC [voltage] offset". You want the reading across each channel's speaker terminals within +/- 50mV (millivolts). I measured the right channel at about 25mV. I measured the left channel at 33V - over 600 times what I expected!
Disappointed, I pulled everything apart and started hunting for mistakes. I knew it was going to be a transistor installed incorrectly because one channel was good, one bad, and capacitors don't amplify voltages. After a few minutes of searching, and double- and triple-checking my work, I found one transistor (Q202a) installed incorrectly.
Lesson learned: the calibration procedure was critical. If I had just plugged it into my speakers to test, I'd be shopping for a new pair of speakers.
 |
| Work bench during one disassembly. |
Excited, I put everything back together for final testing. Both calibration checks checked out. All good. It's time to fire this baby up!
I assembled the amp and took it inside. I powered it on. I queued up a record, dropped the needle, and....
Nothing.
Not a sound came out of the speakers. I turned up the sound just a bit. I heard something - so I maxed it. Terrible, choppy, intermittent sound. I could hear all the loud bits but the quiet parts of the song just dropped off. Stuttery.
My heart fell - I really thought it was going to work. I had no idea what the problem might be. Disappointed, I went back to the garage for disassembly #3.
Mistake #3: Since the problem was present on both channels, I reasoned that I had a serious issue with parts/components. I printed out 7 transistor data sheets (4 old types, 3 new) and started comparing specs.
After a few minutes of comparing data sheets I realized that I did something so dumb that I had to quadruple-check to be sure. Everywhere I wanted to install a BC550 transistor, I'd installed a BC560, and vice-versa.
How did I manage something like this? I looked at my parts list, and from Day 1 I'd spec'd the wrong transistors.
I figured it out later that day. Looking at Hilberink's website again, he says:
The 2SA836 and 2SC1345 made by Hitachi will sooner or later add a lot of noise and even storm and thunder to your RIAA amp. [...]I read these two sentences, and without even thinking to double check, noted to replace 2SA836 units with BC550, and to replace 2SC1345 units with BC560. In fact, it should have been the other way around (2SA836->BC560, both PNP type, and 2SC1345->BC550, both NPN type). This was totally my error - rushing, misunderstanding, and not double checking. I only had to replace 11 transistors and I'd be all set.
Replace with modern BC550C/BC560C and all noise problems are history.

One more set of calibrations as a sanity-check, then I assembled the L-30 for the last time. I'd cleaned and polished the faceplate and all the knobs. The volume knob, which had fallen apart, was securely glued back together.
I plugged the unit it and dropped in an Ella Fitzgerald & Louis Armstrong album that I found in my parents' collection. I don't have the musical vocabulary to describe it as anything other than AMAZING. Superb warm sound.
 |
| That warm sound... get it? |
My Uncle Pete came over tonight to pick it up, and I think he was blown away. He brought over a record (I don't recall which one!) and we listened to most of the A side. Then we listened to tracks from The Sword, The Rolling Stones, Yngwie Malmsteen, Tony Bird, Eternal Champion, Iron Maiden, and Buffalo Springfield.
What's next?
Full album/gallery.
After 50 years my Luxman L-30 that was given to me by my younger brother as a wedding gift finally gave up the ghost this weekend past. I took it apart today hoping to see something obviously wrong, and it appears that three (capacitors?) are melted somewhat. I am not electronically trained but I thought I would see if there was anything online that could be of use. Boy did I hit the jackpot! This is exactly the kind of description of a solution to a problem that you wish everyone who contributes to the internet would be capable of posting. I thank you sir, for the Luxman L-30 remains as the only thing that survived that ill-fated union, and the only thing worth reviving.
ReplyDeleteI have L30 since today:)
ReplyDeleteHow to treat and maintain rosewood?
Thanks in advance
Le bois de rose demande un entretien très limité un chiffon humide et enduite de l'huile de lin laisser sécher et bon coup de chiffon doux et vous retrouverez une brillance et un aspect comme neuf.
Delete"Many of the original electrolytic capacitors had leaked their electrolyte gunk (see the big black one in the image below)."
ReplyDeleteThese capacitors are GLUED to the board in prior of soldering at the factory. This gunk you see is GLUE, not electrolyte. And these old capacitors are most likely absolutely FINE and the chances are high they are BETTER (made to a higher quality standard) than the modern ones you've replaced them with. I am yet to find a BAD Nichicon cap from 1970's.
There's far too much 'over restoring' carried out by people who come to the sport from non-electronics background, but hyped up by the hobby.
Ok chill out! I don't even own an amplifier but I thought this was really well written, he obviously enjoyed doing it, learned a lot about focussing and the need for patience, and he had a great time with his uncle. Go rattle your cage somewhere else grandad.
DeleteI found the comment about the capacitators being glued very informative and useful. Agree, this is very well written and extremely helpful, but these kinds of corrections are also of great value.
DeleteThis is a great comment and totally fair! I hope other folks read it before taking their gear apart. From my amateur perspective the glue/gunk myth goes deep - this comment is the first I've heard that nothing is actually wrong!
DeleteMy angle on this hobby is having fun with classic analog electronics. Since elementary school I've loved taking stuff apart, soldering components on circuit boards, and putting to back together. The majority of the quality difference (if any!) is in my head... and that's OK!
To the original poster.
DeleteI think you will find that 99% of the time modern electrolytic capacitors are far superior to capacitors produced decades ago.
That is not entirely correct. The electrolytic capacitors are prone to ageing, and my L30 definitely required new 'lyts.
DeleteHola. Tengo un Luxman L-31. Hace muchos años cometí un error de adolescente, y es poner algo encima del ampli.
ReplyDeleteEscuchando música salió un poco de humo y rápidamente lo apague.
Desde entonces, en estéreo no funciona el canal izquierdo. Me han recomendado un servicio técnico, pero para saber que tipo de reparación requiere, agradecería cualquier comentario.
Gracias
great read
ReplyDeletei just restored my first receiver a nad 3020
and my last original purchase a luxman r-117
both are singing again !
the name of the binding posts ?
ReplyDeleteBU-P3750-0 (black) and BU-P3750-2 (red) from Mueller Electric Co, ordered from Digikey.ca
Deletequick question about the transistors:
ReplyDelete"The pin-out of the new transistors (Emitter-Base-Collector) is different from the old (Emitter-Collector-Base)"
does this mean when installing them, two of the legs need to be 'crossed over'?
great guide by the way, looking forward to putting it to use! just need to order the parts in and i'll be set :D
Sorry for being over a year late replying to this, but the answer is yes!
DeleteFor treating rosewood or any wood combine 4 pts. mineral spirits with 1 pt Double boiled linseed oil. Apply with a rag and buff after 15-20 minutes.
ReplyDeleteI'm in the process of restoring one like this. Originally purchased in 1978 by my dad. Some remarks from dealing with my example:
ReplyDelete* Most of the capacitors had some minor leakage (it's not glue) and/or corrosion. They measured OK-ish with a DMM at first sight, but were usually 20-30% ABOVE the rated capacity. Combined with the crusty stains on the PCB and warbled bottom ends on the caps, I decided to replace them all. As if you need more signs of bad caps. I'm sure some were still good, but since it's open, I might as well replace them all (with decent Panasonic ones).
* Even with a solder sucker, I went through A LOT of solder braid. During the assembly process, they clearly didn't spare any expense in that area since there is a giant amount of solder.
* The traces seem to be glued to the PCB without a top layer, so they're pone to letting loose when introduced to heat and the wiggling from clumsy hands. Take your time during the desoldering process and be gentle when removing the bad components. Damaged traces could maybe be stuck into place with some PCB lacquer of sorts.
* The grease under the four heat sinked Toshiba transistors was mostly dried up in mine. Check yours and add some when needed. Be aware that some thermal pastes are electrically conductive, so don't overdo it.
Great and informative comment, thank you for sharing your experiences! 🙂
DeleteThe failure mode of electrolitic capacitors is the decrease of capacity, with the current and on extreme cases the increase of ESR (equivalent series resitance), and also with the temperature (there are electrolitics of 105 C and the normals of 85 C). Manufacturers as Siemens have curves of electrolitics degradation under these factors. Then, if an electrolitic have an higher value than the nominal one, usually is a good indicator of good helth, this happen many times. No all electrolitics degrades in the same degree, the ones that suffer most are the two big and principals (positive and negative principals voltages), because they have to estabilize the AC oscilatory voltages, after a diode bridge (f.eg comprised betwen 0 and 40 Vac) to f.eg 35 Vdc. Those should be measured firts. There are amplifiers like the Sansui A60 in which 50% with their capacitors of 4800 uF have a low value (e.g 2900 uF) and the rest of capacitors ar OK. Other suspectors capacitors are those that deal half cicle rectifiers (common on some NAD amplifiers, but also other brands). In case of A60, with new 4800 uF or 6800 uF, the sound is mervellous, eventhough its construction quality is low. Several times have measured ALL the capacitors of amplifiers with low capacity of the principal capacitors, and the other are OK. You can buy in Aliexpress a multifunction tester, and measure all capacitor, al ALL kind of electronics components, for less than 30€
DeleteMany thanks for your blog, I used to own NAD 3020 and 3020i, sold them out and gave to my dad long time after I found Luxman especially L-30, it's the sweetest 30W+30W ever. The only problem restoring L-30 was finding Volume potentiometer, there was no where to be found. So I have to sacrifce balancing functionality with the new Alps blue velvet pot. I collect many of Luxman amplifiers manufactured before 1985 like L-1, L-2, L-5, L-30, L-10, L-58A, SQ-505x, C-02+M-02, L-225, L-220. Among them L-30 is what I like the most, will keep them until my last breath.
ReplyDeleteAmazing! Thanks for sharing 🙏
DeleteHi , I need just help Could you please tell me how to wire this protection board audio Clover Pro 5.5 speaker protector in a Luxman L30 amplifier? I look forward to your reply. Sincerely, René
ReplyDelete